How to write a well-designed JTE application using Spring Boot
Halil URAL / October 18, 2024
Introduction
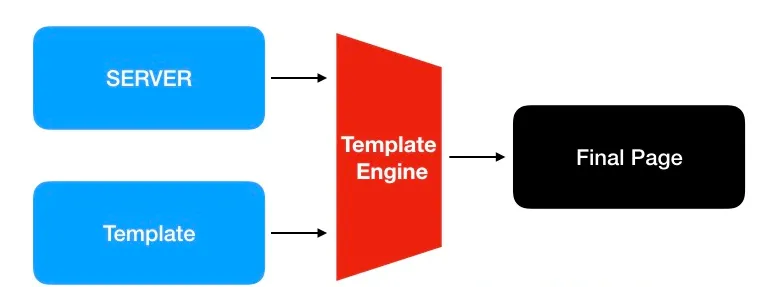
In the Java world, we frequently use template engines like Thymeleaf and Freemarker to have dynamic pages that come from the server side. The server could provide static pages, and anything dynamic is handled by Javascript, or the server could dynamically build the HTML page using a template engine. Before we used to use JSP pages (I’m still using unfortunately in my current project 🤔), and JSP is bad, let’s figure it out why.
JSP is bad.
Here’s why JSP is bad. (Source: my job.)
-
Tight Coupling of Business Logic and Presentation: You have a tight coupling of business logic and presentation, mixing Java code with HTML can lead to poor separation of concerns. This results in hard-to-maintain and less readable code (especially in larger projects).
-
Outdated Approach: JSP has been around for a long time, and newer, more modern alternatives offer cleaner ways to handle templates and views.
-
Performance Overhead: JSP requires compilation and conversion into servlets, which can add a performance overhead compared to pre-compiled template engines.
-
Limited Flexibility: JSP lacks advanced templating features found in modern engines (e.g., conditional logic, loops, inheritance, and reusable components).
I strongly recommend not using JSP in new projects, since in 2024 we have a lot of challenges like building fast, developing with a big team, microservices approaches, and serverless approaches, so we have to be flexible in the front end.
Modern Java Template Engines (JTE, Thymeleaf, Freemarker)
We would like to give an example of cool Java frameworks like Spring Web framework, which is built by embracing the MVC (Model-View-Controller) pattern, so it makes it easier to separate concerns in applications.
So we solved separation of concerns with template engines in Java.
I want to talk about template engine pros more…
-
Separation of Concerns: These engines promote a clear separation between the presentation layer and business logic. Java code doesn’t mix with HTML, making the templates cleaner and more maintainable.
-
Better Readability and Maintainability: Templates are easier to read and edit, even for non-developers, which can be a big advantage in teams that include designers.
-
Rich Templating Features: Support for loops, conditionals, templates, reusable components, and data binding without embedding Java code.
-
Faster Development and Deployment: Engines like JTE offer pre-compilation, reducing runtime overhead and speeding up page rendering compared to JSP.
-
Flexibility and Extensibility: Modern template engines often support plugins or integration with build tools (e.g., Maven, Gradle), making it easier to extend and customize.
Install JTE Plugin
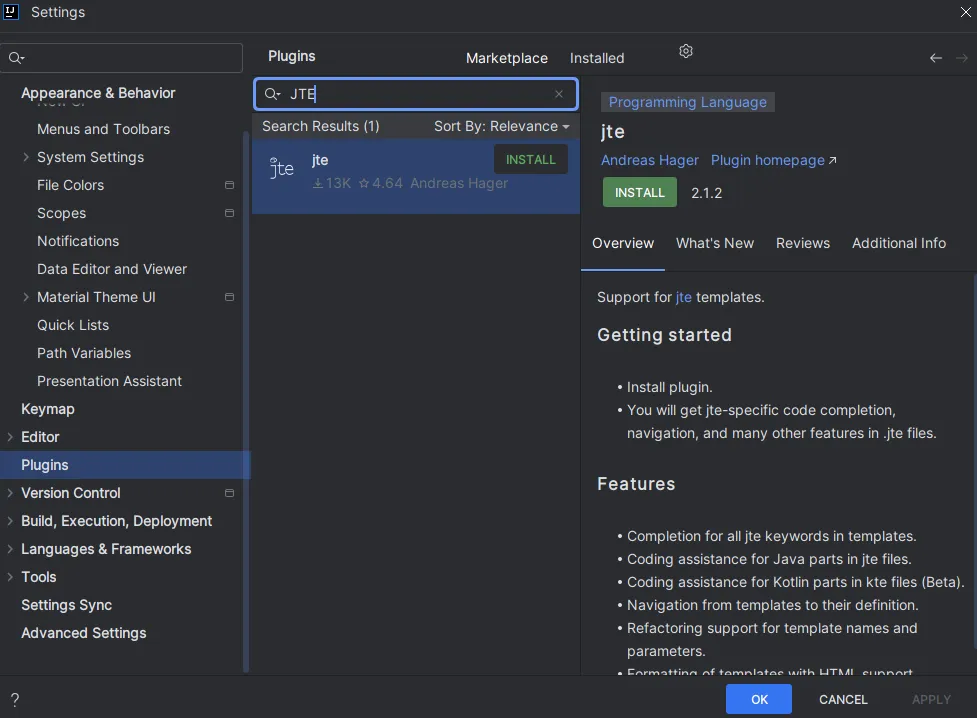
Go to settings -> plugins and install below JTE plugin.

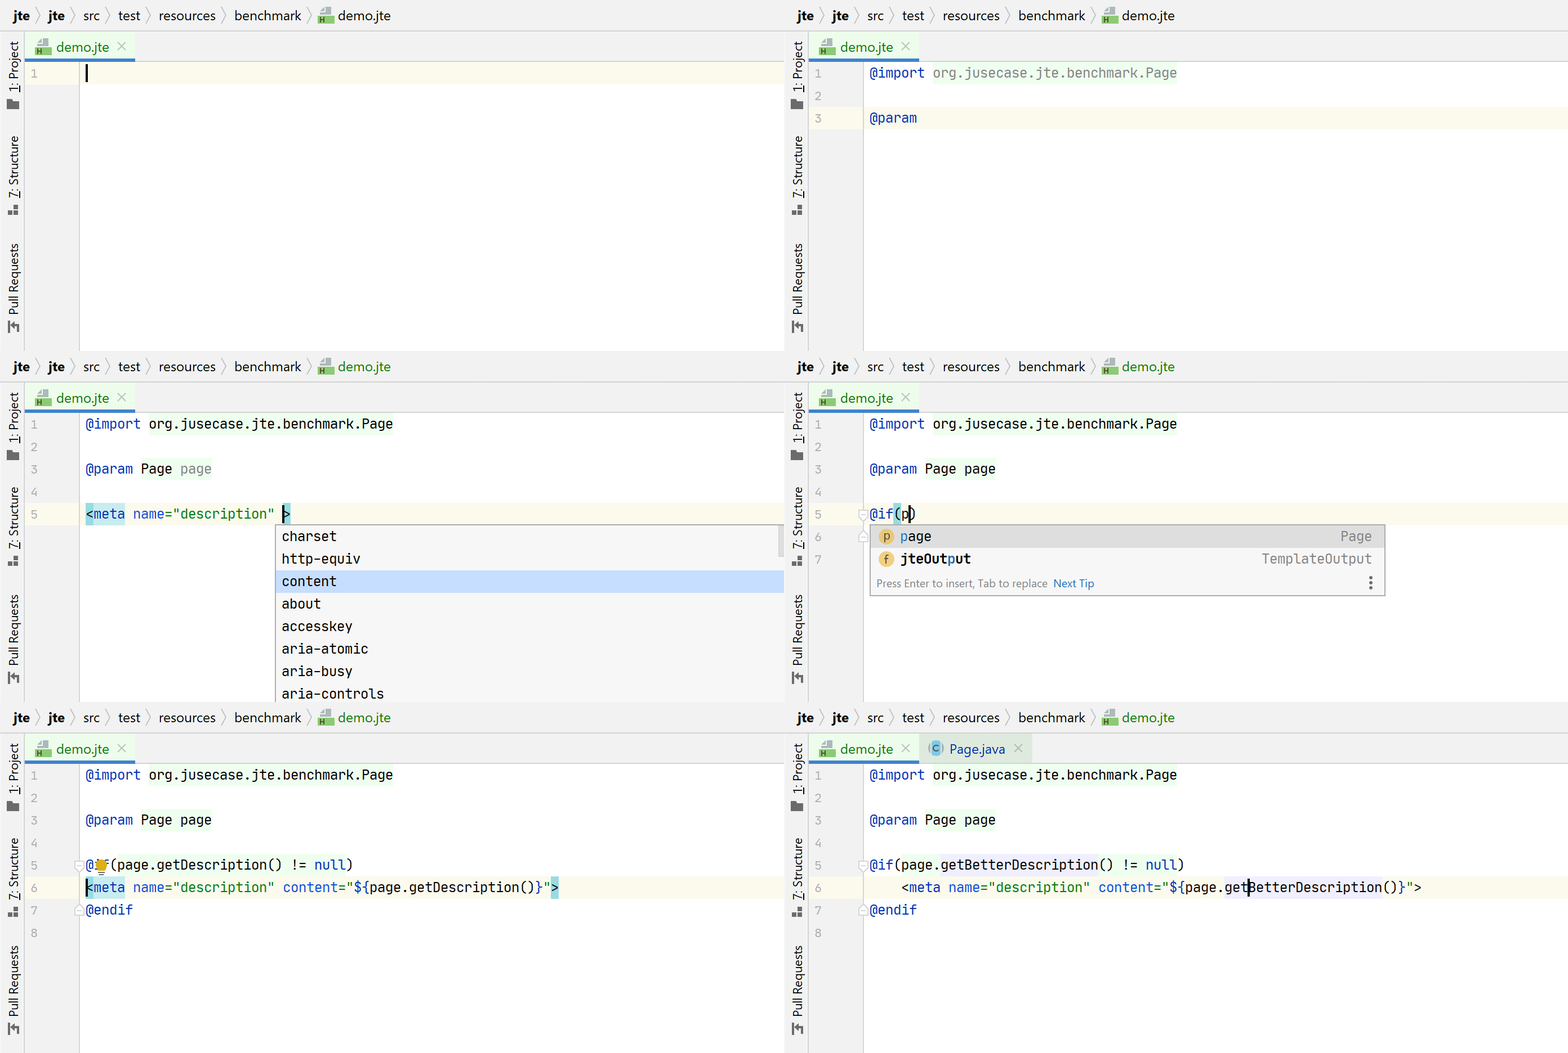
It will give features like below.
-
Completion of all JTE keywords in templates.
-
Coding assistance for Java parts in JTE files.
-
Coding assistance for Kotlin parts in kte files (Beta).
-
Navigation from templates to their definition.
-
Refactoring support for template names and parameters.
-
Formatting of templates with HTML support.

Practice always everything to understand deeply
Let’s walk through setting up a basic Spring Boot application with JTE:
We’re going to use the Spring Boot framework to set up applications easily since it is my favorite framework. I think everyone thinks the same 😊.
I assume that you use IntelliJ IDEA and have enough knowledge to be able to start the Spring Boot application, if you don’t please check how to set up a simple Spring Boot application. I’ll explain it through it.
-
Add necessary spring and JTE dependencies. I added spring-boot-dev-toolsalso whenever we change the JTE files, changes should reflect instantly.
<dependency> <groupId>org.springframework.boot</groupId> <artifactId>spring-boot-starter-web</artifactId> </dependency> <dependency> <groupId>gg.jte</groupId> <artifactId>jte</artifactId> <version>${jte.version}</version> </dependency> <dependency> <groupId>org.springframework.boot</groupId> <artifactId>spring-boot-devtools</artifactId> <scope>runtime</scope> <optional>true</optional> </dependency> -
Just add also build plugins in the build tag pom.xml.
-
JTE Compilation: During the Maven build (generate-sources phase), the JTE plugin generates Java code from .jte templates, converting them into Java classes and binary content.
-
Resource Copying: The Maven Resources Plugin then copies the generated binary files to the appropriate directory (process-classes phase).
-
Spring Boot Packaging: Finally, the Spring Boot Maven Plugin packages everything, ensuring the JTE templates and Spring Boot application are bundled together for easy deployment.
<plugins> <plugin> <groupId>org.springframework.boot</groupId> <artifactId>spring-boot-maven-plugin</artifactId> </plugin> <plugin> <groupId>gg.jte</groupId> <artifactId>jte-maven-plugin</artifactId> <version>${jte.version}</version> <configuration> <sourceDirectory>${basedir}/src/main/jte</sourceDirectory> <contentType>Html</contentType> <binaryStaticContent>true</binaryStaticContent> </configuration> <executions> <execution> <phase>generate-sources</phase> <goals> <goal>generate</goal> </goals> </execution> </executions> </plugin> <!-- Since we use precompiled binary content parts, we need to copy those resources next to the compiled class files (the maven plugin doesn't do that for us) --> <plugin> <artifactId>maven-resources-plugin</artifactId> <version>3.0.2</version> <executions> <execution> <id>copy-resources</id> <phase>process-classes</phase> <goals> <goal>copy-resources</goal> </goals> <configuration> <outputDirectory>${project.build.outputDirectory}</outputDirectory> <resources> <resource> <directory>${basedir}/target/generated-sources/jte</directory> <includes> <include>**/*.bin</include> </includes> <filtering>false</filtering> </resource> </resources> </configuration> </execution> </executions> </plugin> </plugins> -
-
You may want your application to be restarted or reloaded when you make changes to files that are not on the classpath. To do so, add it to the
spring.devtools.restart.additional-paths=./src/main/jte -
For template engines, we still need some config classes that you should create.
-
JteConfiguration
package com.uralhalil.jte.demo; import gg.jte.CodeResolver; import gg.jte.ContentType; import gg.jte.TemplateEngine; import gg.jte.resolve.DirectoryCodeResolver; import org.springframework.context.annotation.Bean; import org.springframework.context.annotation.Configuration; import org.springframework.web.servlet.ViewResolver; import java.nio.file.Path; import java.nio.file.Paths; @Configuration public class JteConfiguration { @Bean public ViewResolver jteViewResolve(TemplateEngine templateEngine) { return new JteViewResolver(templateEngine); } @Bean public TemplateEngine templateEngine() { String profile = System.getenv("SPRING_ENV"); if ("prod".equals(profile)) { // Templates will be compiled by the maven build task return TemplateEngine.createPrecompiled(ContentType.Html); } else { // Here, a JTE file watcher will recompile the JTE templates upon file save (the web browser will auto-refresh) // If using IntelliJ, use Ctrl-F9 to trigger an auto-refresh when editing non-JTE files. CodeResolver codeResolver = new DirectoryCodeResolver(Path.of("src", "main", "jte")); TemplateEngine templateEngine = TemplateEngine.create(codeResolver, Paths.get("jte-classes"), ContentType.Html, getClass().getClassLoader()); templateEngine.setBinaryStaticContent(true); return templateEngine; } } } -
JteView
package com.uralhalil.jte.demo; import gg.jte.TemplateEngine; import gg.jte.output.Utf8ByteOutput; import org.springframework.http.MediaType; import org.springframework.web.servlet.view.AbstractTemplateView; import javax.servlet.http.HttpServletRequest; import javax.servlet.http.HttpServletResponse; import java.nio.charset.StandardCharsets; import java.util.Map; public class JteView extends AbstractTemplateView { private final TemplateEngine templateEngine; public JteView(TemplateEngine templateEngine) { this.templateEngine = templateEngine; } @Override protected void renderMergedTemplateModel(Map<String, Object> model, HttpServletRequest request, HttpServletResponse response) throws Exception { String url = this.getUrl(); Utf8ByteOutput output = new Utf8ByteOutput(); templateEngine.render(url, model, output); response.setContentType(MediaType.TEXT_HTML_VALUE); response.setCharacterEncoding(StandardCharsets.UTF_8.name()); response.setContentLength(output.getContentLength()); output.writeTo(response.getOutputStream()); } } -
JteViewResolver
package com.uralhalil.jte.demo;

import gg.jte.TemplateEngine;
import org.springframework.web.servlet.view.AbstractTemplateViewResolver;
import org.springframework.web.servlet.view.AbstractUrlBasedView;

public class JteViewResolver extends AbstractTemplateViewResolver {

private final TemplateEngine templateEngine;

public JteViewResolver(TemplateEngine templateEngine) {
this.setViewClass(this.requiredViewClass()); this.setSuffix(".jte");
this.templateEngine = templateEngine; }

@Override protected AbstractUrlBasedView instantiateView() { return new
JteView(templateEngine); } }
-
-
Create UserProfileController to add endpoints like showing profile page and form submission.
package com.uralhalil.jte.demo; import org.springframework.beans.factory.annotation.Autowired; import org.springframework.stereotype.Controller; import org.springframework.ui.Model; import org.springframework.web.bind.annotation.GetMapping; import org.springframework.web.bind.annotation.PostMapping; import org.springframework.web.bind.annotation.RequestParam; @Controller public class UserProfileController { private final UserProfileRepository userProfileRepository; @Autowired public UserProfileController(UserProfileRepository userProfileRepository) { this.userProfileRepository = userProfileRepository; } @GetMapping("/profile") public String showProfileForm(@RequestParam(value = "success", required = false) String success, Model model) { UserProfile user; if (userProfileRepository.exists()) { user = userProfileRepository.get(); } else { user = new UserProfile("", "", ""); } model.addAttribute("model", user); return "profile"; } @PostMapping("/profile") public String submitProfile(@RequestParam("name") String name, @RequestParam("surname") String surname, @RequestParam("email") String email, @RequestParam(value = "success", required = false) String success, Model model) { // Save the submitted user profile data UserProfile user = new UserProfile(name, surname, email); userProfileRepository.save(user); // Check if submission was successful if ("true".equals(success)) { model.addAttribute("showSuccessPopup", true); } model.addAttribute("model", user); return "redirect:/profile"; // Return to the profile page with updated data } } -
UserProfileRepository is added to keep the user profile in memory to imitate the real repository.
package com.uralhalil.jte.demo; import org.springframework.stereotype.Service; @Service public class UserProfileRepository { private UserProfile userProfile; // Save the user profile data public void save(UserProfile userProfile) { this.userProfile = userProfile; } // Retrieve the saved user profile data public UserProfile get() { return this.userProfile; } // Check if a user profile exists public boolean exists() { return this.userProfile != null; } } -
Add model UserProfile between your JTE pages and controller, it is a model that is the bridge between View and Controller.
package com.uralhalil.jte.demo; public class UserProfile { private String name; private String surname; private String email; public UserProfile(String name, String surname, String email) { this.name = name; this.surname = surname; this.email = email; } // Getters and Setters public String getName() { return name; } public void setName(String name) { this.name = name; } public String getSurname() { return surname; } public void setSurname(String surname) { this.surname = surname; } public String getEmail() { return email; } public void setEmail(String email) { this.email = email; } } -
The most important is our JTE, so in this JTE, we used @param to get a model.
@import com.uralhalil.jte.demo.UserProfile @param UserProfile model

<!doctype html>

<html lang="en">
  <head>
    <title>User Profile Form</title>
  </head>
  <body>
    <h2>Fill Your Profile Information</h2>
    <form action="/profile" method="post">
      <label for="name">Name:</label><br />
      <input
        type="text"
        id="name"
        name="name"
        value="${model.getName()}"
        required
        minlength="2"
        maxlength="50"
      /><br /><br />

      <label for="surname">Surname:</label><br />
      <input
        type="text"
        id="surname"
        name="surname"
        value="${model.getSurname()}"
        required
        minlength="2"
        maxlength="50"
      /><br /><br />

      <label for="email">Email:</label><br />
      <input
        type="email"
        id="email"
        name="email"
        value="${model.getEmail()}"
        required
      /><br /><br />

      <button type="submit">Submit</button>
    </form>
  </body>
</html>
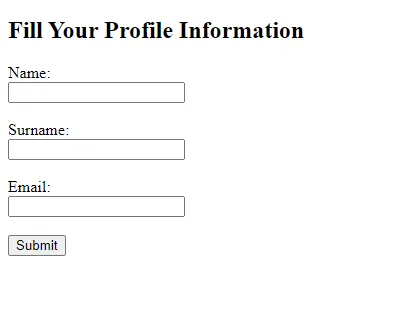
After that, you’ll encounter a page like this, please fill out the form and click Submit button, then you’ll see that the profile information is still there.

I’m also leaving a repo so you can clone and 🌟 it if you like.
Conclusion
The integration of the Java Template Engine (JTE) with Spring Boot provides a powerful and efficient way to build dynamic web applications. Unlike traditional JSP, JTE offers a more modern, type-safe approach to rendering HTML, resulting in faster development, fewer runtime errors, and better performance. By following this example, you can see how easy it is to create and manage user profiles with a clean and intuitive setup using JTE.
As web development continues to evolve, adopting streamlined and effective tools like JTE can significantly enhance the way developers build and maintain their applications. Whether you’re creating simple forms or complex web pages, JTE offers a robust, flexible, and performant solution for your Java-based projects.
Give JTE a try, and see how it can simplify your template rendering and improve your web application’s overall efficiency.
🔥 Liked this article? Don’t forget to clap, follow, and share it with your friends! Your support helps us create more content like this. If you want to read more articles like this, consider subscribing here.
🌟 Support us on Ko-Fi: If you found this article helpful, consider buying us a coffee on Ko-Fi. Your support means the world to us and helps keep the content coming!